
I Transformed a “Soulless” All-White Home Office into a “Gorgeous” Garden Party
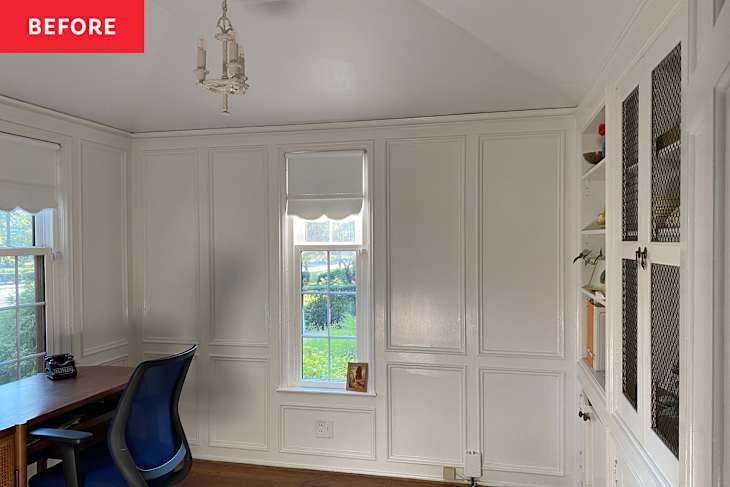
Some people love all-white rooms — but not me. When I moved into my suburban Ohio home three years ago, I was ecstatic to finally have a home office of my own. The only problem: The snowy built-in shelves and paneling felt so, well, soulless. The room oozed character — wall moldings, a built-in with custom cabinet doors, a tray ceiling with possibly the original light fixture — but everything was white-washed into oblivion.
As an interior design writer and editor, my professional world is literally seeped in color. In between assignments, I’d daydream about color drenching the office, but where to start? I didn’t want to swap out white for just any color, so paralyzed with indecision, I kept the office white.


The aha! moment to lean into a garden motif was spurred by a rug. Instagram kept feeding me ads of the Iris Apfel x Ruggable collaboration, and I became enamored with the Flutterby pattern. At the time, I was recovering from my guest bathroom makeover, so I wasn’t ready to pick up the paintbrush just yet. But the rug was a step toward adding color into this space.
The teal in the rug gave me the idea to paint the built-in and the paneling in an aqua. Deciding on the paint color was easy. I’m a regular at a local paint shop and had my eye on Benjamin Moore’s Antique Glass (CSP-695), a rich color true to its name. The painting process was pretty straightforward. I used Zibra brushes because they have flexible bristles and come in triangle and cut-in angles to neatly go over the narrow sections of the cabinet doors and molding, which I planned to keep white to create contrast. I didn’t want to bother with painter’s tape, so precision was key.

Deciding on the wall-covering pattern was a process — it took months! The only room of the house where I have full control, I wanted to go bold here. I wanted peel-and-stick because I know how to install it — and if my maximalist tendencies got the best of me, it could be easily replaced. Chasing Paper’s peel-and-stick, made from self-adhesive poly-woven fabric, actually feels like real wallpaper, so it was on my radar. Immediately drawn to the red Peonies print — it made me think of the interiors of the famed fashion editor Diana Vreeland — I put up a sample and lived with it for a few weeks.

Finally ready to add the red bloom design to my cart, I ordered 10 sheets of 2×8-feet panels. At $90 per panel, the wall covering is definitely a splurge, but it’s also what makes the office stand out. I added the top panels, and when my husband came in he said he was “dizzy.” I have to admit that after installing the first two sections, I got nervous. After all, I went from a blank canvas to what looked like a field of poppies in The Wizard of Oz.
I woke up at 7 a.m. the next morning, anxious that the pattern was too much. So I called in some reinforcements by sending a progress photo to a designer friend, Leah Alexander of Beauty Is Abundant. “I am worried I went too bold with the wallpaper … do you think I should keep the bottom white? Or just go all in?!” Her reply: “Please go all-in! No fear, Yelena, girl.”

Leah’s words of encouragement gave me the confidence to fully embrace my “all-in” blooms. Taking a risk is scary, even if it is wallpaper. But I am so glad that I didn’t falter (even as some people raised an eyebrow at this choice). Now, when I am working in my office, I’m reminded to go after intimidating things. Believe it or not, the wallpaper gives me confidence and serves as a reminder to trust myself.
With the paint and wall covering done, decor was the last step. The light fixture was also painted white, but I had a hunch it was actually brass. After applying CitriStrip paint stripping gel, then wrapping the light in clear plastic wrap, I let it sit for 4 hours. My suspicions were confirmed. Once the paint peeled away, I saw the golden sheen of brass beneath — plus, some intricate floral details completely disguised by layers of paint.

Next, I reupholstered a chair that once belonged to my husband’s grandma; it’s the perfect perch when visitors stop by. I happened to have a quirky velvet that looked like egg crates (I bought it for $3 at a garage sale). The rich sunflower yellow matched the details of the peony centers, and that entire project took less than 30 minutes.
All I had to do was cut the fabric and staple it snugly over the cushion. The vibrant yellow was fun, but not enough for this seating nook, so I took it further by adding a cream throw (a similar hue as the leaves on the wallcovering), and a whimsical tiger pillow from Society6.

A trip to HomeGoods resulted in a marble and brass plant stand that doubles as a mini side table. I also picked up marble knobs that look like dandelions, adding to my garden theme. This was a (mostly) easy swap, but I did have to use a hacksaw to remove the original brass knobs that were stuck.

Organizing the shelving on the built-ins took hours, but I started by decluttering old magazines and miscellaneous tchotchkes. I focused on curating my collection of design books, ceramics, and planters. I stayed true to the wall covering and added pops of yellow and red throughout to tie it all together.

All the additional decor elements, sourced from HomeGoods, thrift stores, or repurposed from other spaces around the house bumped my makeover expense another $200. I am still looking for the perfect office chair. The floors need to be refinished, too — but that’s a project for another time.
And the grand total for this gorgeous, colorful wonderland of a home office? Just over $1,000 and worth every penny!
Design Defined
Never miss the style inspo and recommendations you crave with Design Defined. Follow along each week as our Home Director Danielle shares the best style advice, latest trends, and popular decor finds you just can't miss.