
My Renter-Friendly IKEA Lamp Hack Fixed My Harsh Lights for $32
As someone who has moved apartments 11 times in my life, I’m no stranger to making renter-friendly changes. From mounting shelves to putting up peel-and-stick wallpaper, I’ve tried it all — with some satisfying victories and cringe-worthy mistakes.
When I moved into my current apartment, it was nearly perfect. It was spacious, had stunning natural light, and was even rent stabilized (a huge plus in Los Angeles!). But then I found a flaw: The harsh, un-dimmable flush-mount light fixtures in each room had started to give me headaches.

I had gotten targeted ads for lighting solutions for flush-mount fixtures that cost upwards of $150, but those ready-made options weren’t within my budget.


The IKEA BLÅSTÅNG was the perfect cover-up.
I eventually found a solution when I went to IKEA to help my friend with a home project of her own. There, I saw the BLÅSTÅNG pendant shade: a wide, woven lamp shade that gave me an idea. I decided I could cut it at its widest point, place it over the fixture to cover my glaring light source, and mount it with Command clips to keep it attached to my ceiling — all without making any major changes to the light source itself.

Once I gathered all of the materials — which were truly just the BLÅSTÅNG lamp shade for $24.99, a pack of Command Light Clips for $6.99, and a pair of scissors — I got to work. First I had to cut the IKEA shade so it could fit around my fixture. I was careful to cut above the wire rim of the lamp where it was sewn into place so it would not unravel.
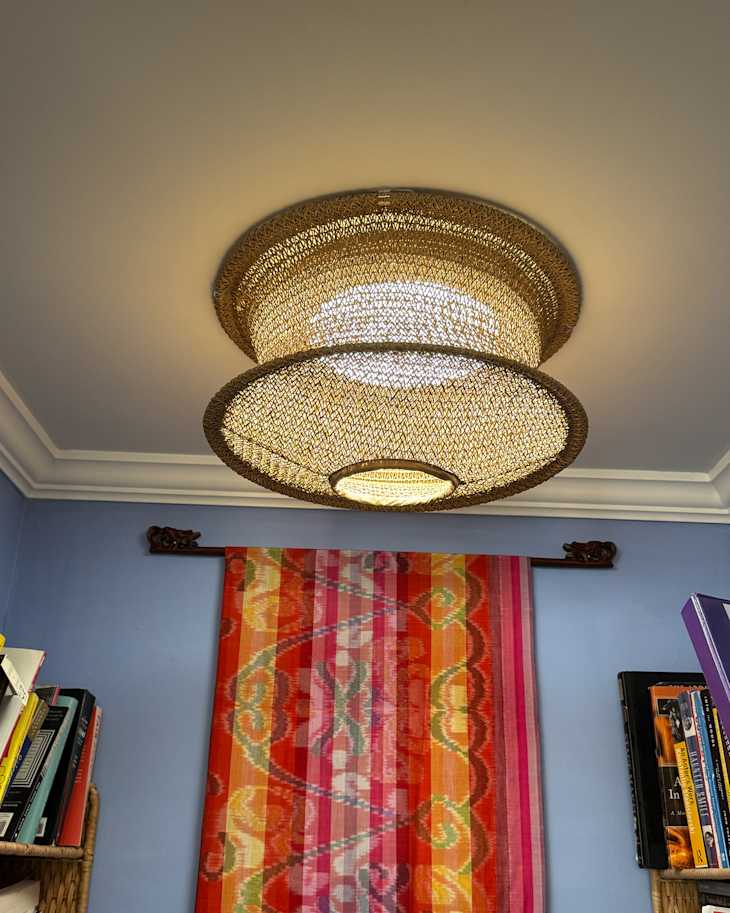
I clipped the IKEA shade around the existing light.
After a quick cut-job, I was surprised to find that the clips for my setup were shaped perfectly to fit around the lamp’s wire rim. I added four clips around the perimeter of the frame and marked where I wanted the lampshade to land on my ceiling.
I applied pressure to the Command clips for a couple of hours so I wouldn’t have to worry about them falling down. (You can use a broom or any long stick that can stand upright for a long period of time.)
My new fixture matches perfectly with the rest of my apartment’s warm, natural vibe, and I’m excited to do this project on more of my lights. (The cost makes it easy!) The whole project took under 10 minutes and felt like a perfect beginner-level DIY for any renter trying to make their home feel a little more customized.
If you’re trying this in your own home, I’d recommend turning on the light you’re covering so you’re able to see how the lampshade will newly illuminate your space. This project would be perfect for any home with a “boob light” or other non-dimmable light source you’re hoping to soften.
Inspired? Submit your own project here.