
I Transformed the Ugliest Thing in My Kitchen, and Now It’s My Favorite
I recently moved into a new home with my husband and daughter, which has brought all of the normal challenges associated with moving … plus some unexpected ones, like what to do with all the stuff the previous owner had left. Among the many (many, many, many) items, were six seemingly brand-new metal trash cans.


We decided to keep them, but I wasn’t really a fan of their ’90s-but-not-in-a-good-way aesthetic. When my husband said he thought they gave the kitchen a cute “bumblebee vibe” with the yellow wall color, I immediately knew I needed to make a change. I’d seen a technique for painting trash cans in this video from Instagram, and I wanted to try it out myself. Here’s how it went and what I learned.

Supplies Needed to Paint a Trash Can
- Metal trash can
- 220-grit sanding block
- Dust cloth and multi-surface cleaner
- Metal primer spray
- Spray paint
- Acrylic topcoat
- Painter’s tape
How to Paint a Metal Trash Can
The most important part of this process, as with all painting projects, is the prep! Put the work in early on, and you’ll be rewarded with better results. Here’s how I painted my trash can.


1. Scuff-sand the surface.
I prepared the surface by using a 220 sanding block to lightly scuff up the surface — just enough to knock down the glossy finish. Next, I wiped off the can with the dust cloth and cleaned it with surface spray.


2. Prime the trash can with a formula that’s made for metal.
After shaking the can of primer really well for a few minutes, I sprayed about three light coats, letting each dry for at least 15 minutes. I pushed the foot pedal down a few times to make sure the lid didn’t seal shut with the wet paint.


3. Tape off your desired pattern.
Once I’d sprayed the final coat of primer I let the can sit for two hours to fully dry before taping off the stripes.
I started with one piece of tape down the top of the middle of the lid, and continued down the front side. I used two small pieces on each side to account for the width in between, then placed the next tape stripe. After placing the three stripes on top of the can, I continued going around the sides until the can was completely taped off.

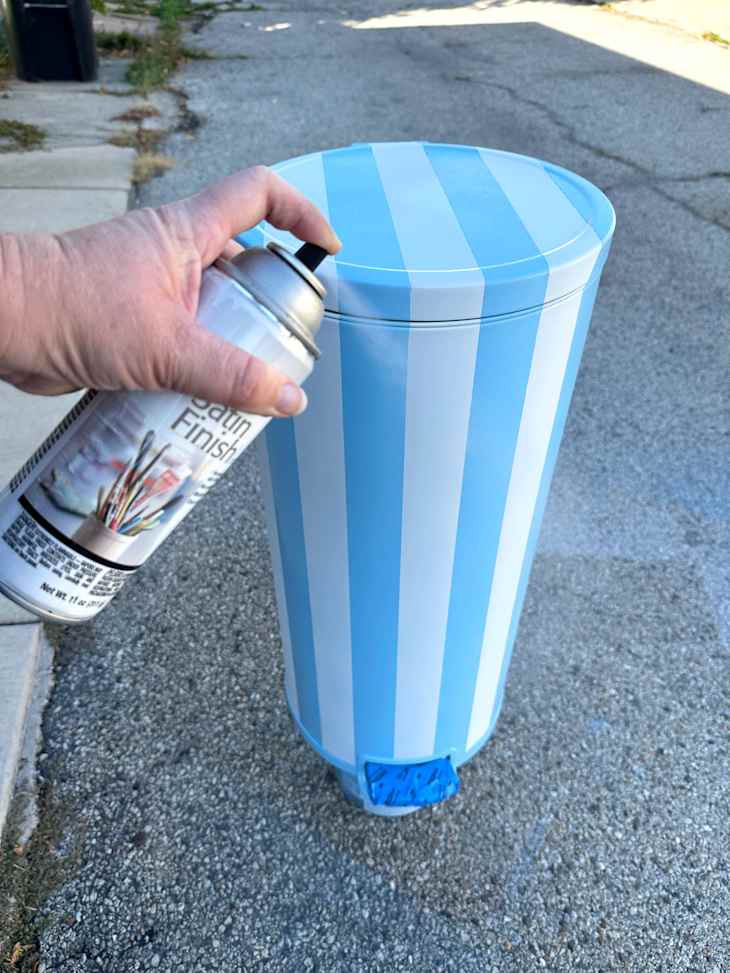
4. Paint your second color.
Once all the stripes were taped, I sprayed two light coats of the blue paint and then removed the tape immediately before it dried.
5. Finish with a protective top coat.
After the can was completely dry, I sprayed it with a clear protective acrylic sealant and let it sit and cure for two days before using it in the kitchen.

Tips for Painting a Trash Can
I am absolutely obsessed with how the trash can turned out, and I can’t wait to paint the other five! I haven’t had my “new” trash can for even two weeks yet so I can’t speak to long-term wear, but it’s holding up great so far. Here are some things I did to get the best results.

I didn’t paint the foot pedal.
I decided to tape off the foot pedal because it will see a lot of use and I didn’t want it to be eventually scuffed up. I’d recommend you do the same for your trash can.
I propped up the trash can to paint the whole thing.
Before priming, I set the trash can up on a smaller bucket. That allowed me to spray all the way down to the bottom edge and under the can for a really smooth, clean look.
I removed the tape immediately after painting.
The longer the tape is on, the more likely you are to mess up your paint. Remove it completely while the paint is still wet for the best results.

My Final Verdict: Everyone Should Paint a Trash Can
This project was straightforward and pretty easy, and I love the results. I think the stripes look so cute in our yellow kitchen, and I’m wondering if maybe now I need to add some tiny bunches of bananas to really make this trash can pop. It used to be the ugliest thing in my kitchen, but now it’s my favorite!