
How Fresh Grout (and a Little Caulk) Totally Rescued My Bathroom Tiles
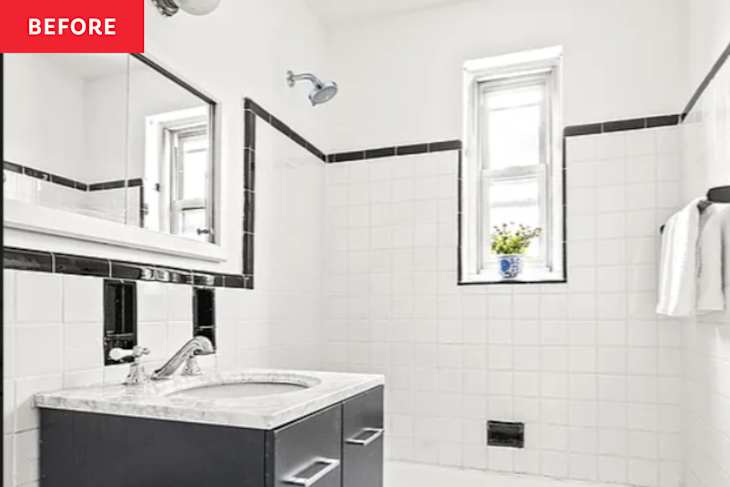
When I moved into my apartment in Brooklyn, my first order of business was to tackle the bathroom. I fell in love with the classic, charming New York-style black-and-white tile — but having not been touched since the 1940s, it needed more than a little bit of TLC. So on the day I picked up the keys, I gave it a very deep clean … and then I dove right into the “fun stuff.”
In my mind, I’d be relaxing in a bubble bath with my perfectly polished and refreshed bathroom by the following weekend. It took just a little bit longer than I anticipated for that to come to fruition, but once it was done (and now reflecting on these “before” pictures), it was all so, so worth it.


As I said, the bathroom’s most stylish feature was definitely the original tiles and ceramic fixtures, so I knew I didn’t want to touch those. The floors, however, were another story. There were several very large cracks running through the tiles — and the grout was so dark it appeared black.
I decided to try and clean out the cracks to assess the damage, so I got myself an electric scrubber and got to work scrubbing my grout. But imagine my surprise (and shock and horror) when I saw my black grout begin to turn gray, and eventually white, as I lifted up decades of grime. Thankfully, the cracks weren’t too deep, so I ruled out the potential of any major water damage. But now, that dirty grout just had to go.
Regrouting your tile is no small task, but really anyone can do it. I got myself a grout saw from The Home Depot, and went to work filing away all of the old grout between the tiles. I chose a new off-white grout, and seriously, spreading it on was like magic. Now, those original cracked and tired tiles look so fresh and clean!
Though I only did this for the floors, once I saw the impact it had, I decided to remove and replace the caulk around my baseboards and bathtub as well — and boy, was I glad I did that, too. It was so satisfying to literally peel that grime and gunk away and swipe on a new, clean bead of pure white silicone instead. If you plan on tackling this project, too, definitely be sure to pick up a mask and gloves, since the old caulk can sometimes be moldy, and the fumes from the fresh silicone are pretty strong.

After getting the foundation right, it was off to the races; I dove in headfirst and got to work decorating the space. I did have a painter come in to do the entire apartment — the bathroom went from Benjamin Moore’s Chantilly Lace to White Dove, a much warmer shade, and that made a huge difference in warming up the space.
Afterwards I decided to fix up the vanity a bit, too. It had pretty extensive water damage, and the MDF was warped in places. I switched out the handles for unlacquered brass pulls and filled the old holes. Then I sanded and painted the whole thing in Rustoleum’s Protective Enamel paint, for a shiny, strong finish – and it’s held up very well so far to any moisture, stains and scratches.

Now, is it really a bathroom refresh if you don’t learn a bit of plumbing? Maybe don’t try this at home, kids (do as I say, not as I do!), but I did also switch out the faucet on my vanity and replace my showerhead — and it really made all the difference in the world.
The old showerhead had been plastic, so I swapped it for a filtered chrome fixture from Amazon, and added a handheld as well for easy cleaning. I can’t stress enough how easy this was; if you do nothing else to your own bathroom, definitely try this. And again, renter-friendly so long as you hold on to that old fixture and reinstall! Always check with your landlord if you’re not entirely sure what’s allowed.
And don’t worry, my plumber checked my work later and was quite impressed (not-so-humble brag).

For the finishing touches, I installed glass shelves above the toilet and an accordion-style magnifying mirror. The shelves added some much-needed storage for perfume, floss, and cotton rounds. Meanwhile the mirror felt like an appropriate nod to the vintage aesthetic of the room, and it’s also proven to be a lifesaver for a contacts wearer such as myself.
I had been dreaming of this Cold Picnic bath mat ever since I first saw the space, so when they had a sample sale in Brooklyn last year, I rushed to grab one (sadly, they don’t make this model anymore, but all of their designs are amazing). Then I found the ruffled shower curtain to match, and it all started coming together!

To finish it off, I hung up some framed prints, added a couple of plants, and styled the space with these adorable mix-and-match towels from Rachel Zoe I found at Marshalls. I love the idea of pattern-mixing, and this felt like the perfect low-lift, high-impact space to try it out for the first time.
I could not be happier with the way this bathroom turned out. Though it may not be a dramatic transformation, I think it’s clear how much a bit of TLC and intentional styling can really improve any space.
Design Defined
Never miss the style inspo and recommendations you crave with Design Defined. Follow along each week as our Home Director Danielle shares the best style advice, latest trends, and popular decor finds you just can't miss.