
This “Man Cave” Basement Transforms into a Sweet Retro Family Room
The decade was the 1970s, and the trend was wormwood paneling. If you’ve never heard of this type of wood paneling, you’re lucky. Its primary characteristic is ample tunnels and holes created by larvae — and it was all over my basement, which had a bar section.
When I first moved into our suburban Cleveland house, I called a pest inspector in a panic because I was convinced we were sharing our home with hungry wood-eating insects. Some of the holes in the wood paneling were big enough for me to fit my finger through! It was supposed to be rustic — I thought it looked rough.

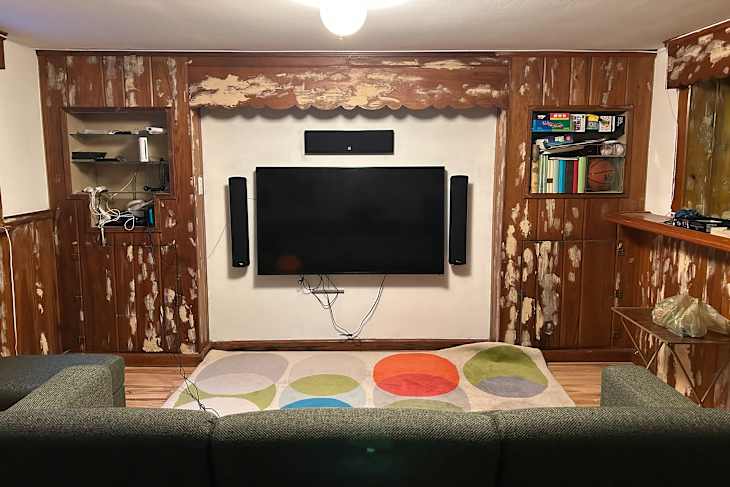
With dull khaki paint on the walls, the entire basement just looked like a space without an ounce of personality, a time capsule in the worst way. I used the bar cabinets as storage for holiday wine glasses, but otherwise, I barely stepped foot in there.
My kids, on the other hand, used it as a video game and sleepover hub. Soon enough, wires were taking over the built-in cabinets and the TV. It looked like an electronic octopus lived down there.

The wormwood holes and the reddish chestnut paneling also drove my husband wild. So last summer, he took buckets of wood filler and went to work. It was an ongoing process that took months, as he completed a few panels at a time. Six buckets of wood filler later, and he was ready to smooth out the paste. Erroneously, we thought our sander would vacuum up most of the dust. Word to the wise: Unless you rent a professional-grade sander or splurge on a fancy model, expect a crazy amount of dust. Even with the couch and the decor covered in plastic, cleanup took days. In hindsight, we should have used a wet cloth to wipe away all the excess wood filler. Nevertheless, this part of the project was finally done.
Then it came time to paint, because I didn’t love the reddish brown hue of the wood. I felt like the basement needed a timeless shade that worked like a neutral but still made a statement. I immediately gravitated toward burgundy hues and brought home dozens of samples ranging from rosy plum to dusty eggplant. With its violet undertones, Benjamin Moore’s Sequoia (1245) was the winner. I opted for 50% saturation to soften the hue. In the basement light, it almost read as a warm brownish mauve, which was perfect. (I actually used this paint on the trim in my dining room-turned-music room upstairs — funny how it was there all along).

Once the wood was ready for painting, we used Insl-X Stix bonding primer to make sure all the wood filler was covered properly; otherwise, matte spots would come through, even after paint application. I always use Benjamin Moore Advance for trim and cabinets because it creates an almost shell-like finish, especially in satin.
Color drenching the entire space, including the bar, would have been too much and would have made the space look one dimensional. I wanted more contrast, especially on the window frames that sport the same scallop detail as the bar and trim around the built-in cabinets. The walls above the paneling are painted a creamy Benjamin Moore’s White Chocolate (2149-70). (Don’t tell my husband, but one day I have a plan to add some sort of delicate striped wallpaper because white walls aren’t my jam!)

For bar and accent paint selection, I took to Chasing Paper Ruth’s Garden wallpaper samples from when I was looking for the perfect bloom print for my office. The sinuous lines of the florals leant into the groovy theme of the scallop detail. I chose the Velvet Magnolia colorway because it had the most neutral background, a gentle taupe.
To be honest, before I locked in the wallpaper, I was playing the design theme by ear. Once it was installed, though, the rest of it came together as a retro dream. Instead of forcing a modern aesthetic into something that clearly wasn’t, I leaned into the architectural and structural details I couldn’t change, like the rust-colored laminate countertops in the bar. Coincidentally, the bird of paradise blooms in the wallpaper were a great match.

Back at the paint store, I found an almost identical green for the curvy leaves, Benjamin Moore’s Greenbrook (517). The combo of the rust and green worked perfectly. It helped that the wallpaper’s hydrangeas and their light background added some brightness to the dim space. To bring it all together and give the bar a more lived-in look, I brought down the Liz Lidgett Gallery Fields canvas that I received as a holiday gift from the brand, which breaks up the florals with its geometric lines. I also found the most darling antique framed dry flowers at a local boutique, Mix Vintage. Turns out they were original Floralp Tyrol pieces from Austria, and I got them for just $26.
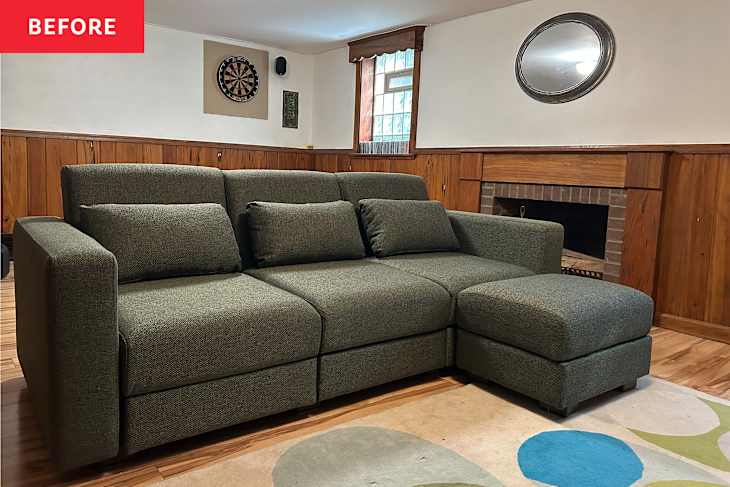
Back in the main area, my Cozey sleeper sofa, which has a similar olive hue, anchored the space. I then painted the window trim and the trim of the built-in with Greenbrook.

Once all the paint and wallpaper installation was complete, deciding on the rest of the decor was an organic process, and I shopped my home for pieces where I could. To create a seating nook around the couch, we brought down a Loloi woven rug from HomeGoods. It looked much better here than in my living room.
The ivory introduced lightness underfoot, but the woven ochre hexagons were still on theme for the room. I also relocated my Article round glass table and Hetta side table here to make sure the sofa didn’t look lonely. Since the side table was a bit dark, I got creative and gave it another layer by adding a scalloped bread board that I found in my kitchen.


My goal for the bar was to display quirky glassware, and I went on a scavenger hunt for a perfect tray: a green marble cheeseboard with a brass cheetah detail, which I also found locally at Mix Vintage for $32. (I found the same one for $389 on Chairish!). Since the floors are in no way heated, adding a runner to the bar was a no-brainer. I’ve been eyeing an earthy geometric piece from Cozey, and it was kismet that the design was a reflection of the Fields artwork above.
Overall, because I relocated most of the furniture and decor pieces from elsewhere in my home, the vintage pieces cost me less than $70. Between the wood filler, the paint, and primer, and the peel-and-stick wallpaper (which runs $90 per panel, and I used about seven), the total materials cost was about $1,000.

This was a slow-and-steady project that took almost six months to complete, mainly because of all the wood filling, smoothing, and paint color swatching and selecting. It was all worth it, though, because now I have the perfect spot to host my book club. My kids might need to find another perch for their video game playing!
Design Defined
Never miss the style inspo and recommendations you crave with Design Defined. Follow along each week as our Home Director Danielle shares the best style advice, latest trends, and popular decor finds you just can't miss.